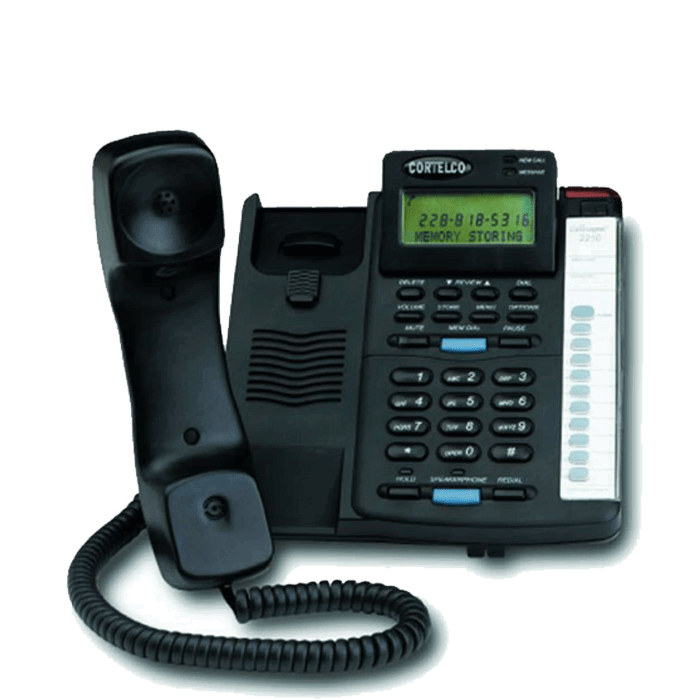
 Cortelco 2210 Single-Line Headset Compatible Telephone
| Backlit Extra Large 3-line LCD Panel | 10 Direct and 10 Keypad Memories |
| Dual Headset Jacks | Caller ID with Call Waiting |
| Programmable Flash | 80 Message CID Memory |
| Tone/Pulse Switch | 5-Year Warranty |
| Redial | Cortelco warranty/support 800-288-3132 x118 |
| Cortelco 2210 Brochure | Cortelco 2210 Manual |
Your Cortelco 2210 Wireless Headset Solution:
The CS540 Headset Offers The Latest In Wireless Technology!
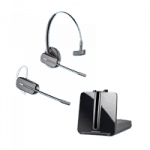 Choose your wearing style.
It’s so comfortable, you’ll forget you’re wearing a headset with the CS540. With two wearing styles included, you decide what’s best for your all-day wearing comfort.
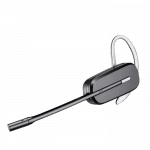
One-touch controls for adjustments on the go.
Speaker volume & microphone mute controls are at your finger tips allowing you to adjust your CS540 remotely without returning to your desk.
 Fast and Easy Setup.
Setup only takes a few minutes with compatibility, microphone and speaker volume controls. CS540 base settings are easily configurable to maximize your audio experience.
Productivity Booster.
Up to 350 feet of range to roam your office and 7 hours of talk time improve productivity as you’re able to gather information throughout your office while continuing to talk.
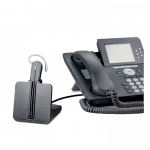
 Remote Answer & Hang-Up.
The HL10 further increases your efficiency, providing the ability to answer your calls remotely. When away from your desk, the headset alerts you to calls, so you never miss calls to voice mail.
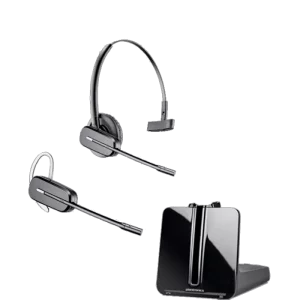 Poly CS540 Wireless Headset(Desk Phone)Add to cart
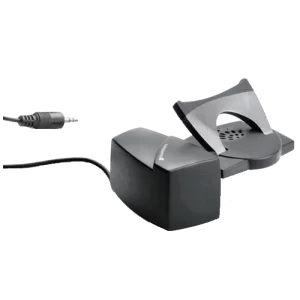 Poly HL10 Handset Lifter (Straight Plug)(Straight Plug)Add to cart
Your Cortelco 2210 Corded Headset Solution:
The HW510 Sets The Standard For Business Grade Corded Headsets!
All day wearing comfort.
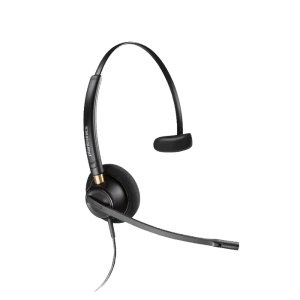
Plantronics most popular headset, the HW510 provides great value, durability and comfort for any business professional. The HW510 lets you interact with co-workers and communicate within your office by leaving one ear open and with the noise-canceling microphone, your caller hears your voice and not background office noise.
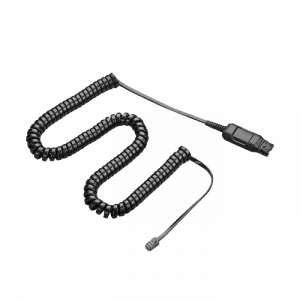
A10-16 Direct Connect cable for Cortelco 2210.
The A10-16 cable connects between your HW251 headset and your phone ensuring compatibility and making setup quick and easy.
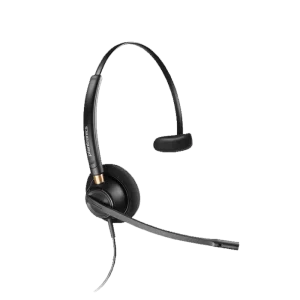 Poly EncorePro HW510 Headset(Quick Disconnect)Add to cart
 Poly A10-16 Direct Connect Cable for QD HeadsetsAdd to cart
Setup Guide – Cortelco Phone
Cortelco 2210 Telephone
The following guide will show step-by-step how to setup, install and start using your new Cortelco telephone. Please allow 2-3 minutes to install your phone.
Preview of What’s Ahead:
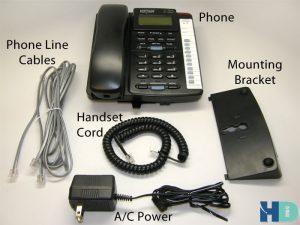
What’s in the Cortelco box.
Step 1: Install the handset cord.
Step 2: Plug-in A/C power adapter.
Step 3: Choose phone line cable and plug-in.
Step 4: Confirm dial tone.
What’s in the Cortelco box:
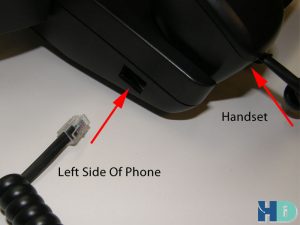
Step 1: Plug cables into telephone.
1) Plug the handset cord into the handset and the side of the phone.
2) Plug the A/C power supply cord into the phone and an available electrical outlet. This will power the display.
3) Choose the long or short phone line cable and plug into the phone and an available wall jack.

At this point you should hear dial tone in the handset before proceeding.
Setup Guide – Wireless Headset
- Plantronics CS540 Wireless Headset
- HL10 Handset Lifter
- Cortelco 2210 Telephone
The following guide will show step-by-step how to setup, install and start using your new Plantronics CS540 wireless headset and HL10 handset lifter with the Cortelco single-line telephone. Please allow 20 minutes to charge the CS540 headset followed by 5-10 minutes to complete installation. Once setup is complete and you have tested the unit, allow 3 hours to fully charge the battery before your first full day of usage.
Preview of What’s Ahead:
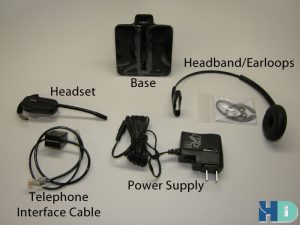
What’s in the Plantronics CS540 box.
Step 1: Charge the CS540 Headset for 20 Minutes.
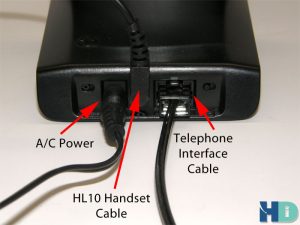
Step 2: Plug the Telephone Interface Cable into the Base.
Step 3: Connecting the CS540 to Your Telephone.
Step 4: Understanding Your CS540 Wireless Headset.
Step 5: Understanding Your CS540 Base Adjustments.
What’s in the Plantronics CS540 box:
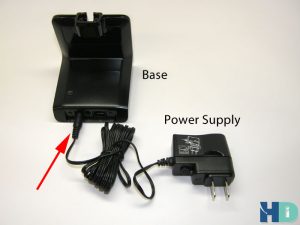
Step 1: Charge the CS540 Headset for 20 Minutes.
Take the AC Power Supply adapter and plug one end into your wall outlet or power strip. The other end will plug into the back of the CS540 base as shown in the following picture. Place the headset into the base. You will feel a snug pull when the two magnets pull ensuring a perfect fit. The charging LED will flash green when charging and turn solid green when fully charged. A 20 minute charge will be sufficient to complete the setup and installation. A 3 hour charge will be required for a fully charged headset.
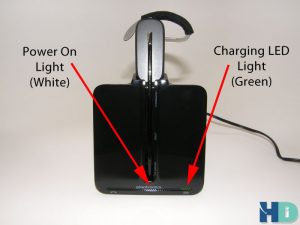
Flashing Green = Charging
Solid Green = Fully Charged
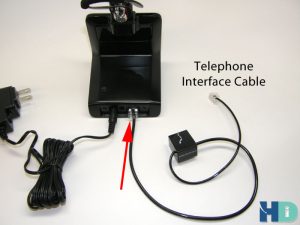
Step 2: Plug the Telephone Interface Cable into the Base.
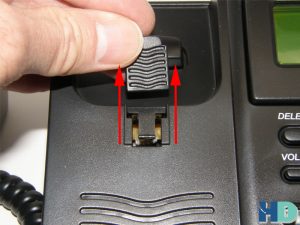
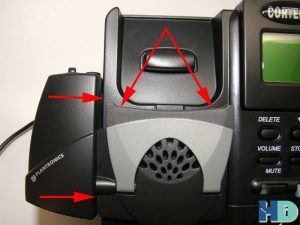
Step 3: Remove Handset Hook From Telephone.
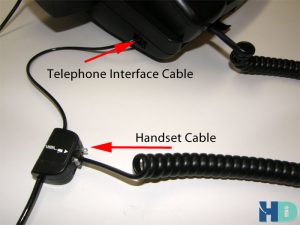
Step 4: Install Telephone Interface Cable.
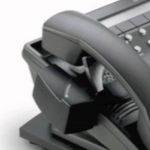
Step 5: HL10 Handset Lifter Installation.
Attach your HL10 Handset Lifter to your phone using the 3 adhesive strips on the under side of the lifter. Position the lifter as shown below for best results. Plug the HL10 cable into the back of the CS540 base as shown.
Step 6: Compatibility and Volume Settings.
On the bottom of the headset base, set the compatibility slide switch to ‘A’ and both the speaker and microphone volumes to ‘1’.

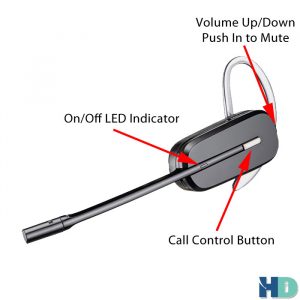
Step 7: Using Your CS540 Wireless Headset.
Your CS540 wireless headset has two buttons:
1) Call Control Button – This is how you answer and end calls. When the headset is in use, the LED indicator light will flash white.
2) Volume/Mute Button – The second button (or rocker switch) is located at the back of the headset and controls your speaker volume. When pushed up, it raises your speaker volume and pushed down decreases the volume. You have 3 levels so continue pressing for increased or decreased volume levels. Pushing this button in will mute and un-mute your microphone.
Setup Guide – Corded Headset
- Plantronics HW510
- 66268-03 A10-16 Cable
- Cortelco 2210 Telephone
The following guide will show step-by-step how to setup, install and start using your new Plantronics HW510 headset and A10-16 direct connect cable with the Cortelco single-line telephone. Please allow 2 minutes to install the headset and A10-16 cable into your phone and begin using.
Preview of What’s Ahead:
What’s in the Plantronics HW510 & A10-16 box.
Step 1: Connect your headset and A10-16 cable.
Step 2: Connect headset to phone and activate port.
Step 3: Make/Take calls with your headset.
What’s in the Plantronics HW510 & A10-16 box:
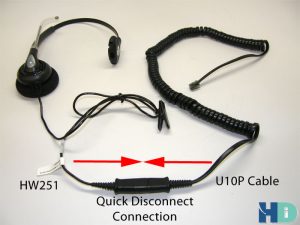
Step 1: Connect Headset & Cable.
The HW510 and A10-16 cable both have a matching connection called a Quick Disconnect. Connect the HW510 and the A10-16 cable by pushing the two connections together. This connection allows you to quickly and easily disconnect the headset from the bottom cord, allowing you to walk away from your desk. If you’re on a call, this puts the call on hold within the headset. Upon returning to your desk you simply re-connect and your call is back.
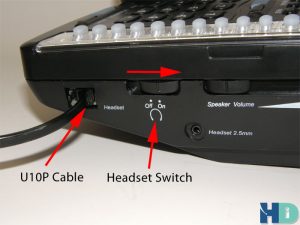
Step 2: Connect Headset and Activate Port.
With your HW510 headset and A10-16 cable connected, take the end of the A10-16 cable with the smoke colored modular clip and insert it into the port on the right side of the phone labeled ‘Headset’. You will find a switch on the Cortelco phone with a picture of a headset and ‘Off/On’. Slide the switch to the right, into the ‘On’ position to activate the headset port. This allows one-touch operation of your headset when making and taking calls.
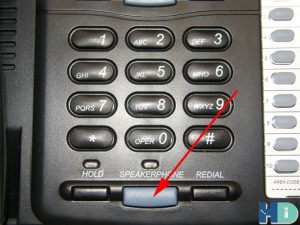
Step 3: Making and Taking Calls with Your Headset.
To make a call with your new headset system, simply press the blue button pictured below which gives you dial tone and you’re ready to enter your phone number. To receive a call, with your phone ringing simply press the blue button and your call is automatically answered and active in the headset.
To disconnect a call, press the blue button.
You’re Done! – At this point you can add speed dial numbers and learn other features of your phone within the phone’s manual.